Hybrid Search in RAG
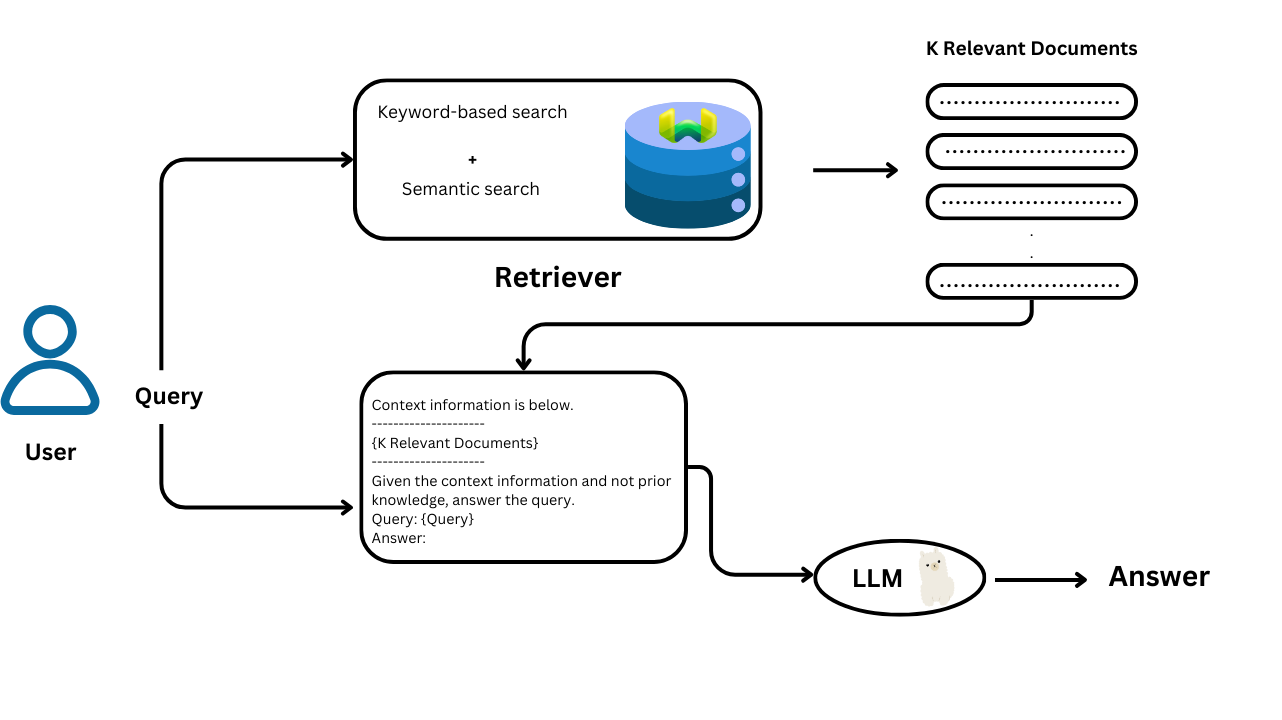
Retrieval-Augmented Generation (RAG) enhances language models by combining retrieval with generation. While traditional language models generate responses based on learned patterns, RAG integrates external information retrieval into the process. This method enables models to provide more accurate and contextually relevant answers by grounding responses in data from a knowledge base.
Keyword-Based Search
Keyword-based search matches query terms directly with indexed documents using techniques like BM25. This approach excels in retrieving precise results for specific terms but can struggle with variations in wording, typos, and synonyms. It relies on exact term matches, which may miss relevant context or alternate phrasing.
Keyword search uses sparse vectors, which are high-dimensional vectors where most elements are zero. These vectors represent language tokens, with non-zero values indicating their importance. The BM25 (Best Match 25) algorithm is a popular method for ranking documents based on keyword matching. BM25 calculates the relevance of documents by considering:
- Term Frequency (TF): How often query words appear in the document (more frequent means higher relevance).
- Inverse Document Frequency (IDF): How rare the query words are across all documents (rarer words increase relevance).
The BM25 score for a document 𝐷 with respect to a query 𝑄 is calculated using:

where:
IDF(𝑞)is the inverse document frequency of term𝑞TF (𝑞,𝐷)is the term frequency of𝑞in document 𝐷∣𝐷∣is the document length,- avgdl is the average document length,
𝑘1and𝑏are tunable constants.
BM25 refines the TF-IDF (Term-Frequency Inverse-Document Frequency) approach by incorporating these additional factors.
Semantic Search
Semantic search uses vector embeddings to understand and retrieve information based on meaning rather than exact keywords. By employing dense vectors generated by modern ML models, semantic search captures the context and nuances of queries and documents. This method handles synonyms and typos better but may overlook specific keywords and depends on the quality of embeddings.
Dense vectors, or embeddings, are high-dimensional arrays filled with meaningful non-zero values. These vectors capture the semantic essence of words, representing their meanings and relationships. Vector search uses these embeddings to find similar items within a vector space.
A common method for vector search is cosine similarity, which measures the angle between two vectors.
It is calculated using:
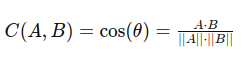
where:
𝐴and𝐵are vectors𝐴 ⋅ 𝐵is the dot product ofAand𝐵∣∣ 𝐴∣∣and∣∣𝐵∣∣are the magnitudes of𝐴and𝐵respectively.
Hybrid Search and Why Hybrid Search
Hybrid search combines keyword-based and semantic search techniques to leverage the strengths of both. By merging precise keyword matching with contextual understanding from semantic search, hybrid search improves the relevance and accuracy of results. This approach addresses the weaknesses of each method individually, providing a more comprehensive and effective search solution.
To implement hybrid search, the results from keyword-based and vector-based searches need to be combined. The hybrid search score 𝐻 is calculated using:
𝐻=(1−𝛼)×𝐾+𝛼×𝑉
where:
𝐻is the hybrid search score𝛼is a weighted parameter𝐾is the keyword search score𝑉is the vector search score
In this formula, α=1 gives a pure vector search result, while α=0 yields a pure keyword search result.
Reciprocal Rank Fusion (RRF)
Reciprocal Rank Fusion (RRF) is another method for combining search scores. It ranks documents based on their positions in keyword and vector search results and merges these rankings to generate a unified list. The RRF score is calculated by summing the inverse of each document’s rank across the two lists, with the formula:
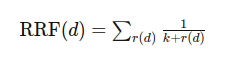
where:
𝑑represents the document,𝑘is a constant,𝑟(𝑑)is the rank of document𝑑in the search results.
RRF penalizes documents ranked lower in the lists, ensuring a balanced fusion of keyword and vector search results.
Code Example
In this project guide, we are building a conversational agent using hybrid search to answer questions effectively. The implementation involves integrating Command-R-Plus as the language model, embed-english-v3.0 for embeddings, and Weaviate as the vector store database. We utilize the Llama-Index framework to streamline and manage the hybrid search pipeline, with a user-friendly interface developed using Mesop.
Install dependencies
This command will install the necessary dependencies for our example.
%pip install llama-index llama-index-vector-stores-weaviate llama-index-llms-cohere llama-index-embeddings-cohere mesop
Import dependencies
We import the necessary dependencies.
import weaviate
import logging
import sys
import os
from llama_index.core.agent import ReActAgent
from llama_index.core import  ServiceContext
from llama_index.core import  SimpleDirectoryReader
from llama_index.embeddings.cohere import CohereEmbedding
from llama_index.llms.cohere import Cohere
from llama_index.core import VectorStoreIndex, SimpleDirectoryReader
from llama_index.vector_stores.weaviate import WeaviateVectorStore
from llama_index.core.response.notebook_utils import display_response
from llama_index.core import StorageContext
from llama_index.core.tools import QueryEngineTool, ToolMetadata
from llama_index.core.query_engine import SubQuestionQueryEngine
Add Cohere API key
We add the Cohere API key to the environment.
cohere_api_key = "xxxxxxxxxxxxxxxxxxxxxxxx"
os.environ["COHERE_API_KEY"] = cohere_api_key
Define Cohere LLM and Embedding Model
We used embed-english-v3.0 for the embedding model and command-r-plus as an LLM.
Check the Documentation for more details.
embed_model = CohereEmbedding(
    api_key=cohere_api_key,
    model_name="embed-english-v3.0",
    input_type="search_query",
)
llm = Cohere(api_key=cohere_api_key, model="command-r-plus")
Create the Service Context
Create the service context with the cohere model for generation and embedding model
service_context = ServiceContext.from_defaults(
    llm=llm,
    embed_model=embed_model
)
logging.basicConfig(stream=sys.stdout, level=logging.INFO)
logging.getLogger().addHandler(logging.StreamHandler(stream=sys.stdout))
Load Documents
To load documents from the pdfs folder and prepare them for processing, use the SimpleDirectoryReader class. This class reads files from the specified directory, filtering by the required extensions (in this case, PDFs).
documents = (
    SimpleDirectoryReader(
        input_dir = '/content/pdfs',
        required_exts = [".pdf"])
        .load_data()
)
Connect to Weaviate
To connect to Weaviate, we use the connect_to_wcs function from the weaviate library , we pass in the cluster URL and API key.
You can also use the connect_to_local function to connect to your local Weaviate instance.
# Connect to cloud instance
cluster_url = "https://myclaster-xxxxxxxx.weaviate.network"
api_key = "xxxxxxxxxxxxxxxxxx"

client = weaviate.connect_to_wcs(
    cluster_url=cluster_url,
    auth_credentials=weaviate.auth.AuthApiKey(api_key),
)

# Connect to local instance
# client = weaviate.connect_to_local()
Create the Vector Store Index
This code creates a vector store index using Weaviate, embeds the document, and sets the search query mode to hybrid, allowing for both keyword and vector search results.
vector_store = WeaviateVectorStore(weaviate_client=client)
storage_context = StorageContext.from_defaults(vector_store=vector_store)
index = VectorStoreIndex.from_documents(
    documents,
    storage_context=storage_context,
    service_context=service_context
).as_query_engine(
    vector_store_query_mode="hybrid",
    similarity_top_k=4,
    alpha=0.5,
)

# NOTE: you may also choose to define a index_name manually.
# index_name = "test_prefix"
# vector_store = WeaviateVectorStore(weaviate_client=client, index_name=index_name)
Create the Query Engines and Tools
We create two query engines here. The first is an individual query engine, useful for answering general questions. The second is a sub-question query engine, which is effective for queries that require in-depth analysis and understanding.
Note: Don't forget to customize the tools' metadata (name and description), and try to mention the topic in the description.
individual_query_engine_tools = [QueryEngineTool(query_engine=index ,
                                                 metadata=ToolMetadata(name="search_index" ,
                                                                       description="useful for when you want to answer general questions."))]

sub_query_engine = SubQuestionQueryEngine.from_defaults(
    query_engine_tools=individual_query_engine_tools,service_context=service_context
)

sub_query_engine_tool = QueryEngineTool(
    query_engine=sub_query_engine,
    metadata=ToolMetadata(
        name="sub_question_query_engine",
        description=(
            "useful for when you want to answer queries that require analyzing"
        ),
    ),
)
Create the Agent
We are using the ReActAgent (A conversational agent) and passing the tools and the LLM to it,we set verbose to False to disable the logging.
tools = individual_query_engine_tools + [sub_query_engine_tool]
agent = ReActAgent.from_tools(
    tools,
    llm=llm,
    verbose=False,
)
To test the agent, we use the chat method.
response = agent.chat("Write your query here")
print(response.response)
Create UI using Mesop
In this section, we'll create a simple user interface for interacting with the ReActAgent using Mesop. This UI will allow users to chat with the agent through a web page.
Create ui.py
This script sets up the UI using Mesop. It defines a web page where users can interact with the agent.
import mesop as me
import mesop.labs as mel

@me.page(
    security_policy=me.SecurityPolicy(
        allowed_iframe_parents=["https://google.github.io"]
    ),
    path="/chat",
    title="QuerySynth Demo Chat",
)
def page():
    mel.chat(transform, title="QuerySynth", bot_user="QuerySynth bot")


def transform(input: str, history: list[mel.ChatMessage]):
    prompt = input                  # Use the input as the prompt for the agent
    response = agent.chat(prompt)   # Get the response from the agent
    yield response.response
To run the app use the command mesop ui.py , once the application is running, open your web browser and navigate to the provided local URL (e.g., http://localhost:32123) to access the Mesop UI.
From here, you can enter queries and receive responses based on the indexed documents.
